선택자( Selectors )
스타일을 적용하려는 HTML 요소들을 선택하기 위해 사용
선택자의 종류는 다양하다.
예시에는 인라인 스타일을 사용함.
요소 선택자, 전체 선택자
- 특정 요소가 쓰인 모든 요소에 스타일을 적용한다.
- *를 사용하여 전체 요소에 적용한다.
- 요소가 너무 많이있는 경우 클라이언트에 부하를 줄 수 있다.
- 개별적으로 적용한 스타일은 전체 선택자에 적용한 스타일보다 우선.
<!DOCTYPE html>
<html lang="en">
<head>
    <meta charset="UTF-8">
    <meta http-equiv="X-UA-Compatible" content="IE=edge">
    <meta name="viewport" content="width=device-width, initial-scale=1.0">
    <title>요소 선택자</title>

    <style>
        * { color: blueviolet; }
        h2 { font-size: 50px; }
        p { color: deepskyblue;}
    </style>

</head>
<body>
    <h2>요소 선택자</h2>
    <p>특정 요소가 쓰인 모든 요소에 스타일을 적용</p>
    <p><span>span 요소</span></p>
    <p><strong>strong 요소</strong></p>
    <p><ins>ins 요소</ins></p>
    <div>div 안에 p 밖에 요소<p>div 안에 p 요소</p></div>
</body>
</html>
Result:

* 상속
위 예시에 <p> 태그 안에 <span>, <strong>, <ins> 요소에도 <p>에 해당하는 스타일이 적용되었다.
이것은 부모 요소의 속성값이 자식 요소에게 전달된 것이고, 상속이라고 한다.
속성에 따라 상속이 되는 것과 아닌 것이 있다.
자세한 내용은 아래 사이트에서 확인할 수 있다.
https://www.w3.org/TR/CSS22/propidx.html
Full property table
'cursor' [ [ ,]* [ auto | crosshair | default | pointer | move | e-resize | ne-resize | nw-resize | n-resize | se-resize | sw-resize | s-resize | w-resize | text | wait | help | progress ] ] | inherit auto yes visual, interactive
www.w3.org
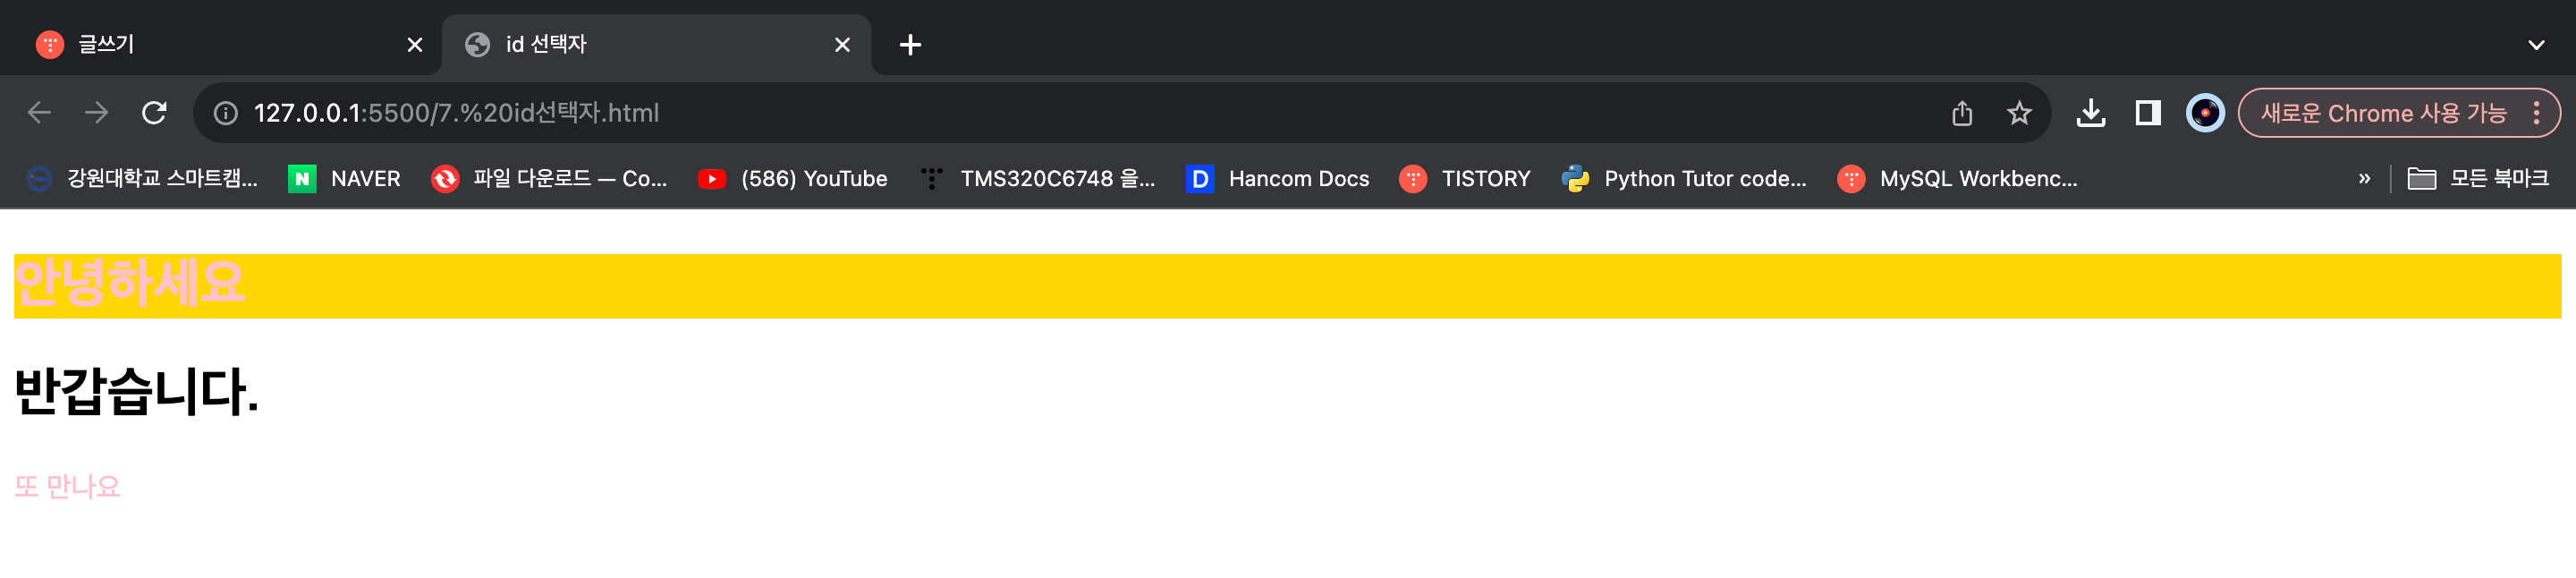
Id 선택자
- 웹 문서의 특정 부분에 스타일을 적용하고 싶은 경우 사용.
- # 기호를 사용하여 id 속성을 가진 요소에 스타일을 적용한다.
<!DOCTYPE html>
<html lang="en">
<head>
    <meta charset="UTF-8">
    <meta http-equiv="X-UA-Compatible" content="IE=edge">
    <meta name="viewport" content="width=device-width, initial-scale=1.0">
    <title>id 선택자</title>

    <style>
        #container {
            background-color: gold;
            padding: 20px;
            width: 500px;
            height: 300px;
            text-align: center;
        }

        #header {
            background-color: deepskyblue;
            width: 200px;
            height: 200px;
            text-align: center;
            margin: 100px auto;
            line-height: 100px;
        }
    </style>

</head>
<body>
    <h2>id 선택자</h2>
    <div id="container">div 첫번째 영역</div>
    <div id="header">div 두번째 영역</div>

</body>
</html>
Result:

Id 선택자 다양한 사용
- id는 중복하여 사용할 수 없다. 사용이 되는 것처럼 보여도 정상 작동을 하지 않을 경우가 있으니 주의해야한다.
- id를 중복하고 싶다면 class 선택자를 사용한다.
<!DOCTYPE html>
<html lang="en">
<head>
    <meta charset="UTF-8">
    <meta http-equiv="X-UA-Compatible" content="IE=edge">
    <meta name="viewport" content="width=device-width, initial-scale=1.0">
    <title>id 선택자</title>

    <style>
        h2 {font-size: 30px; } /* 안녕하세요, 반갑습니다 모두 적용 */
        h2#hello { background-color: gold; } /* 안녕하세요만 적용 */
        #hello { color: pink; } /* 안녕하세요만 적용 */
    </style>


</head>
<body>
    <h2 id='hello'>안녕하세요</h2>
    <h2>반갑습니다.</h2>

    <p id='hello'>또 만나요</p> <!-- id는 중복x -->
</body>
</html>
Result:
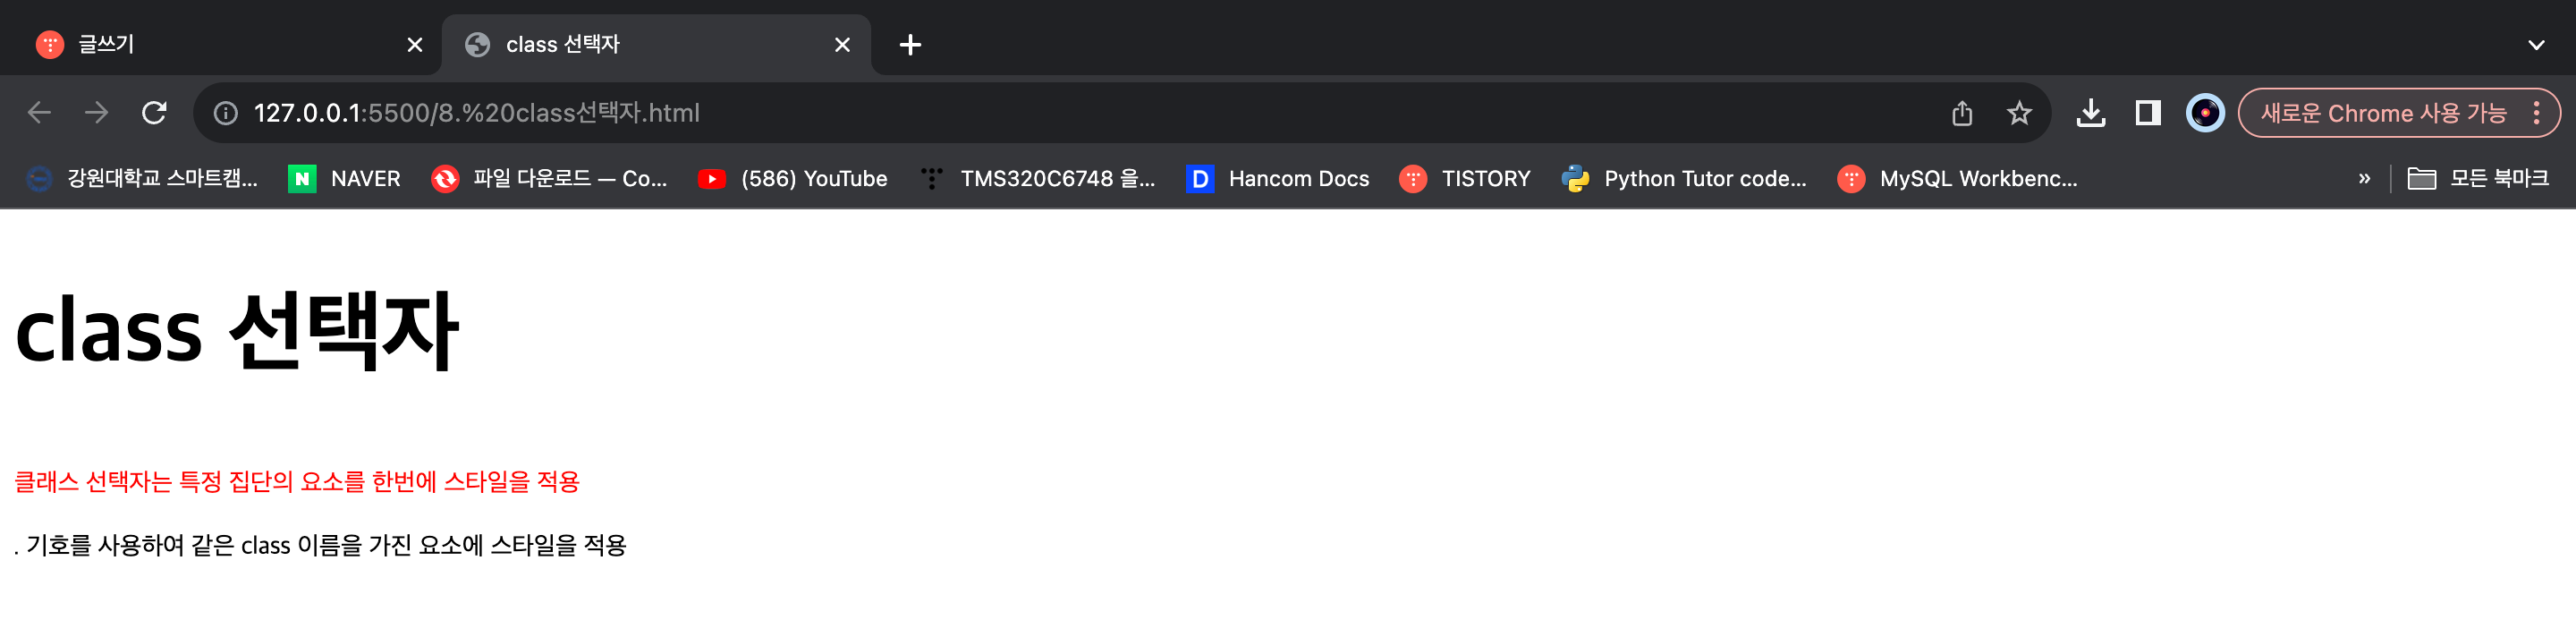
Class 선택자
- 여러 요소들에 같은 스타일을 한번에 적용하고 싶은 경우 사용.
- . 기호를 사용하여 같은 class 이름을 가진 요소에 스타일을 적용한다.
<!DOCTYPE html>
<html lang="en">
<head>
    <meta charset="UTF-8">
    <meta http-equiv="X-UA-Compatible" content="IE=edge">
    <meta name="viewport" content="width=device-width, initial-scale=1.0">
    <title>class 선택자</title>

    <style>
        .bigText { font-size: 50px; }
        .smallText { font-size: 14px; }
        .redText { color: red; }
    </style>

</head>
<body>
    <h2 class="bigText">class 선택자</h2>
    <p><span class="smallText redText">클래스 선택자는 특정 집단의 요소를 한번에 스타일을 적용</span></p>
    <p><span class="smallText">. 기호를 사용하여 같은 class 이름을 가진 요소에 스타일을 적용</span></p>
</body>
</html>
Result:
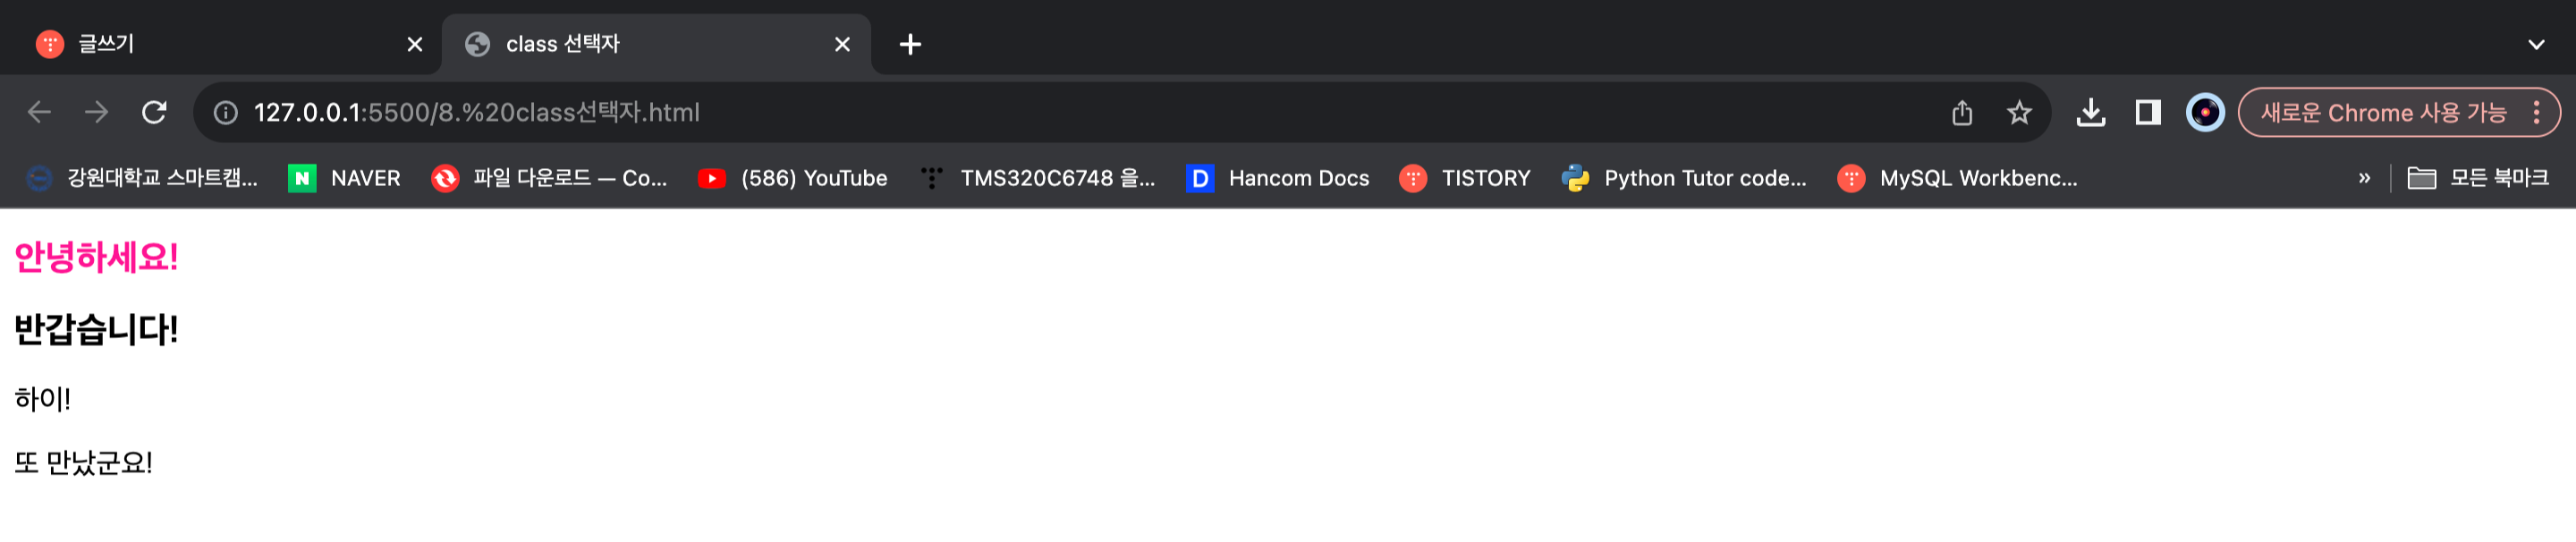
class 선택자 다양한 사용
<!DOCTYPE html>
<html lang="en">
<head>
    <meta charset="UTF-8">
    <meta http-equiv="X-UA-Compatible" content="IE=edge">
    <meta name="viewport" content="width=device-width, initial-scale=1.0">
    <title>class 선택자</title>

    <style>
        h2{ font-size: 20px;} /* 안녕하세요, 반갑습니다 글자크기 20px 적용 */
        h2.hello{color: deeppink;} /* 안녕하세요 글자 deeppink 색상 적용 */
        .h3llo{color: deepskyblue;} /* 안녕하세요, 하이 글자 deepskyblue */
    </style>

</head>
<body>
    <h2 class='hello'>안녕하세요!</h2>
    <h2> 반갑습니다!</h2>
    <p class ='hello'>하이!</p>
    <p>또 만났군요!</p>
</body>
</html>
Result:
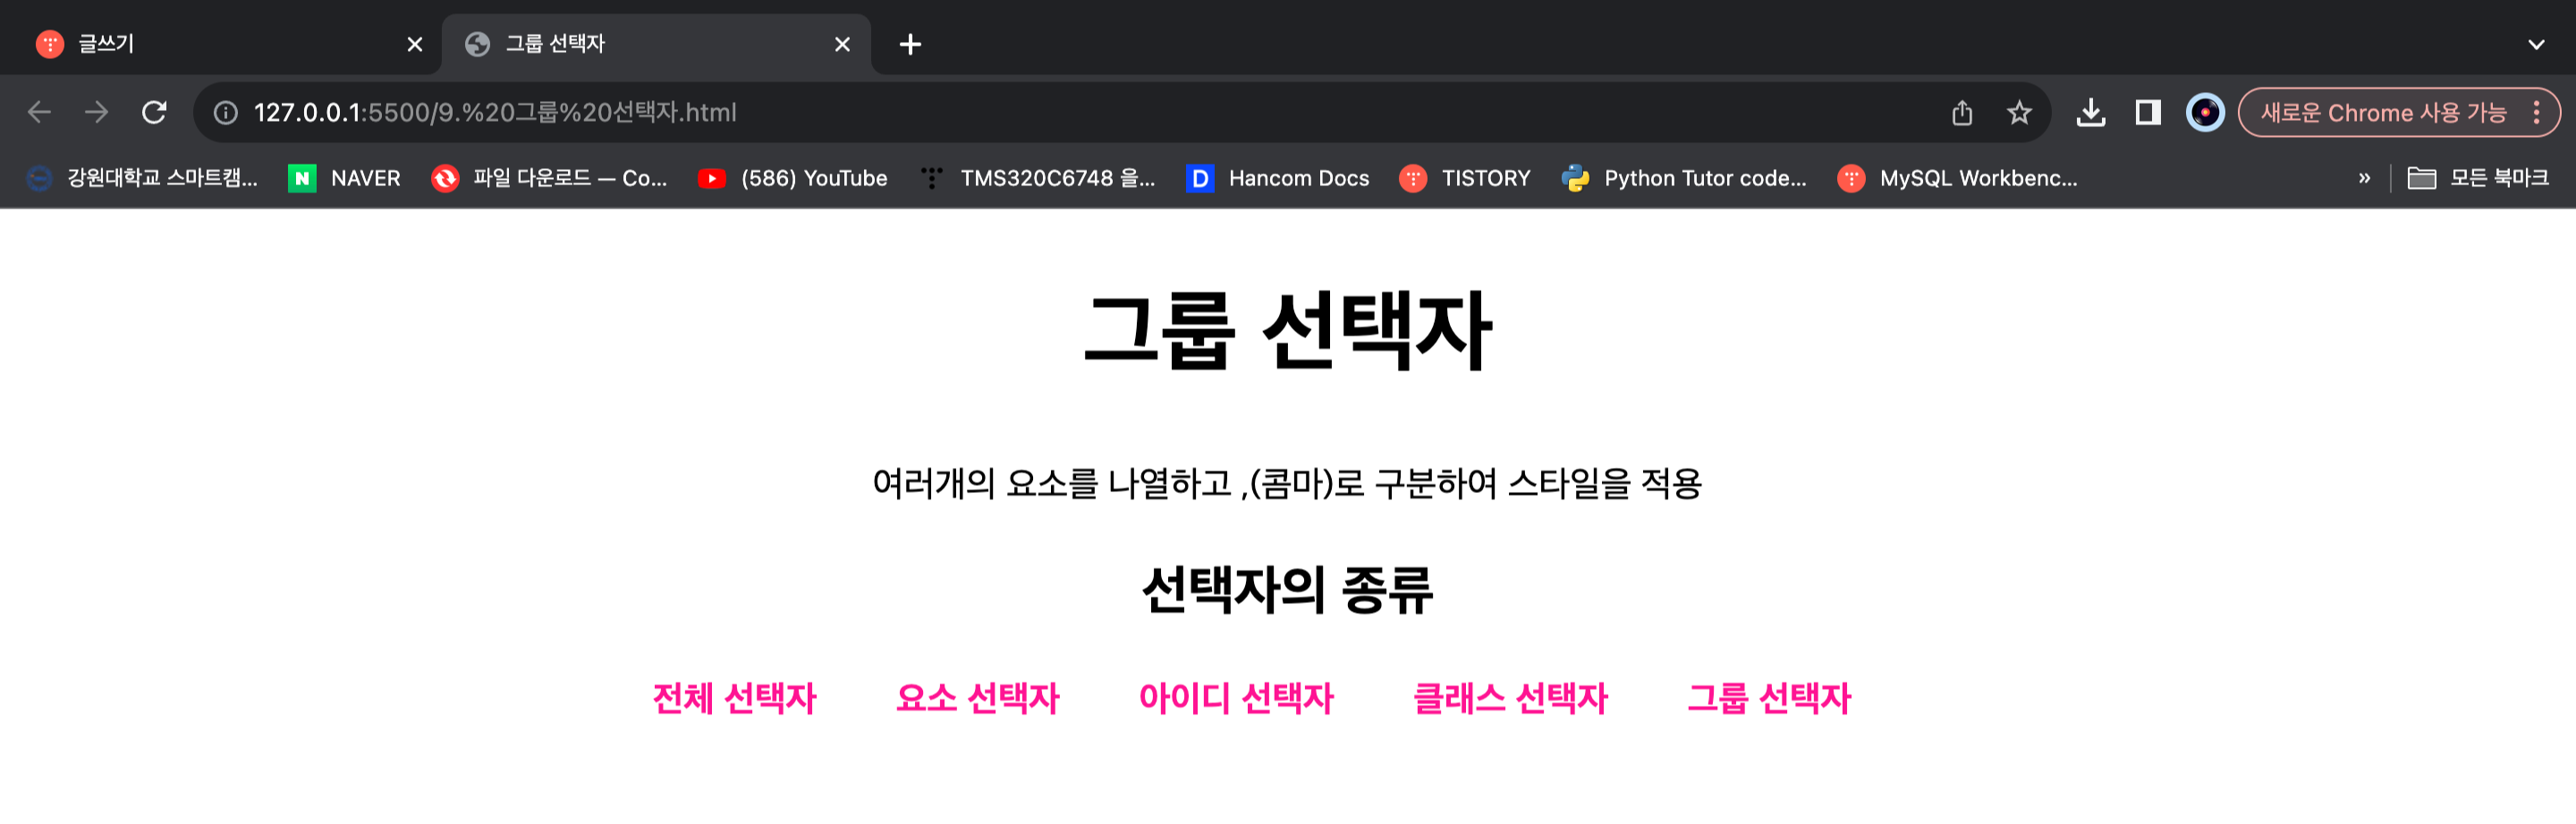
그룹 선택자
- 여러개의 요소를 나열하고 ,(콤마)로 구분하여 스타일 적용
<!DOCTYPE html>
<html lang="en">
<head>
    <meta charset="UTF-8">
    <meta http-equiv="X-UA-Compatible" content="IE=edge">
    <meta name="viewport" content="width=device-width, initial-scale=1.0">
    <title>그룹 선택자</title>

    <style>
        * { text-align: center;}
        h2 { font-size: 50px; }
        h3 { font-size: 30px; }
        p, li { font-size: 20px; } /* 그룹 선택자 사용 */
        li { display: inline-block; margin-right: 40px; font-weight: bold; color: deeppink;}
    </style>

</head>
<body>
    <h2>그룹 선택자</h2>
    <p>여러개의 요소를 나열하고 ,(콤마)로 구분하여 스타일을 적용</p>
    <h3>선택자의 종류</h3>
    <li>전체 선택자</li>
    <li>요소 선택자</li>
    <li>아이디 선택자</li>
    <li>클래스 선택자</li>
    <li>그룹 선택자</li>
</body>
</html>
Result:
자식 선택자
- 부모요소 하위의 자식요소에 스타일을 적용한다.
자손 선택자
- 조상요소 하위의 모든 요소에 스타일을 적용한다.
- 자손은 자식을 포함
<!DOCTYPE html>
<html lang="en">
<head>
    <meta charset="UTF-8">
    <meta http-equiv="X-UA-Compatible" content="IE=edge">
    <meta name="viewport" content="width=device-width, initial-scale=1.0">
    <title>자식 자손 선택자</title>

    <style>
        ul > a { font-size: 30px; } /* 자식 선택자 사용 */
        ul a { color: deeppink; } /* 자손 선택자 사용 */
    </style>

</head>
<body>
    <h2>자식 자손 선택자</h2>
    <ul>
        <a href="https://www.naver.com">네이버</a>
        <li><a href="https://www.google.com">구글</a></li>
        <li>다음</li>
        <li><a href="https://www.nate.com">네이트</a></li>
    </ul>
</body>
</html>
Result:

형제 선택자
인접 형제 선택자
- 동일한 부모의 요소를 갖는 자식 요소들의 관계
- 연속된 형제 요소의 스타일을 적용한다.
일반 형제 선택자
- 형제 관계를 갖는 요소 중에서 다음에 나오는 모든 형제 요소에 스타일을 적용한다.
<!DOCTYPE html>
<html lang="en">
<head>
    <meta charset="UTF-8">
    <meta http-equiv="X-UA-Compatible" content="IE=edge">
    <meta name="viewport" content="width=device-width, initial-scale=1.0">
    <title>일반 형제 선택자</title>

    <style>
        p + span { color: gold; background-color: deepskyblue; } /* 인접 형제 선택자 사용 */
        h3 + p { background-color: deeppink; } /* 인접 형제 선택자 사용 */
        h3 ~ p { color: green; } /* 일반 형제 선택자 사용 */
    </style>

</head>
<body>
    <h2>일반 형제 선택자</h2>
    <div>
        <h3>첫째</h3>
        <p>둘재</p>
        <a href="#">셋째</a>
        <h4>넷째</h4>
        <p>다섯째</p>
        <span>여섯째</span>
    </div>
</body>
</html>
Result:

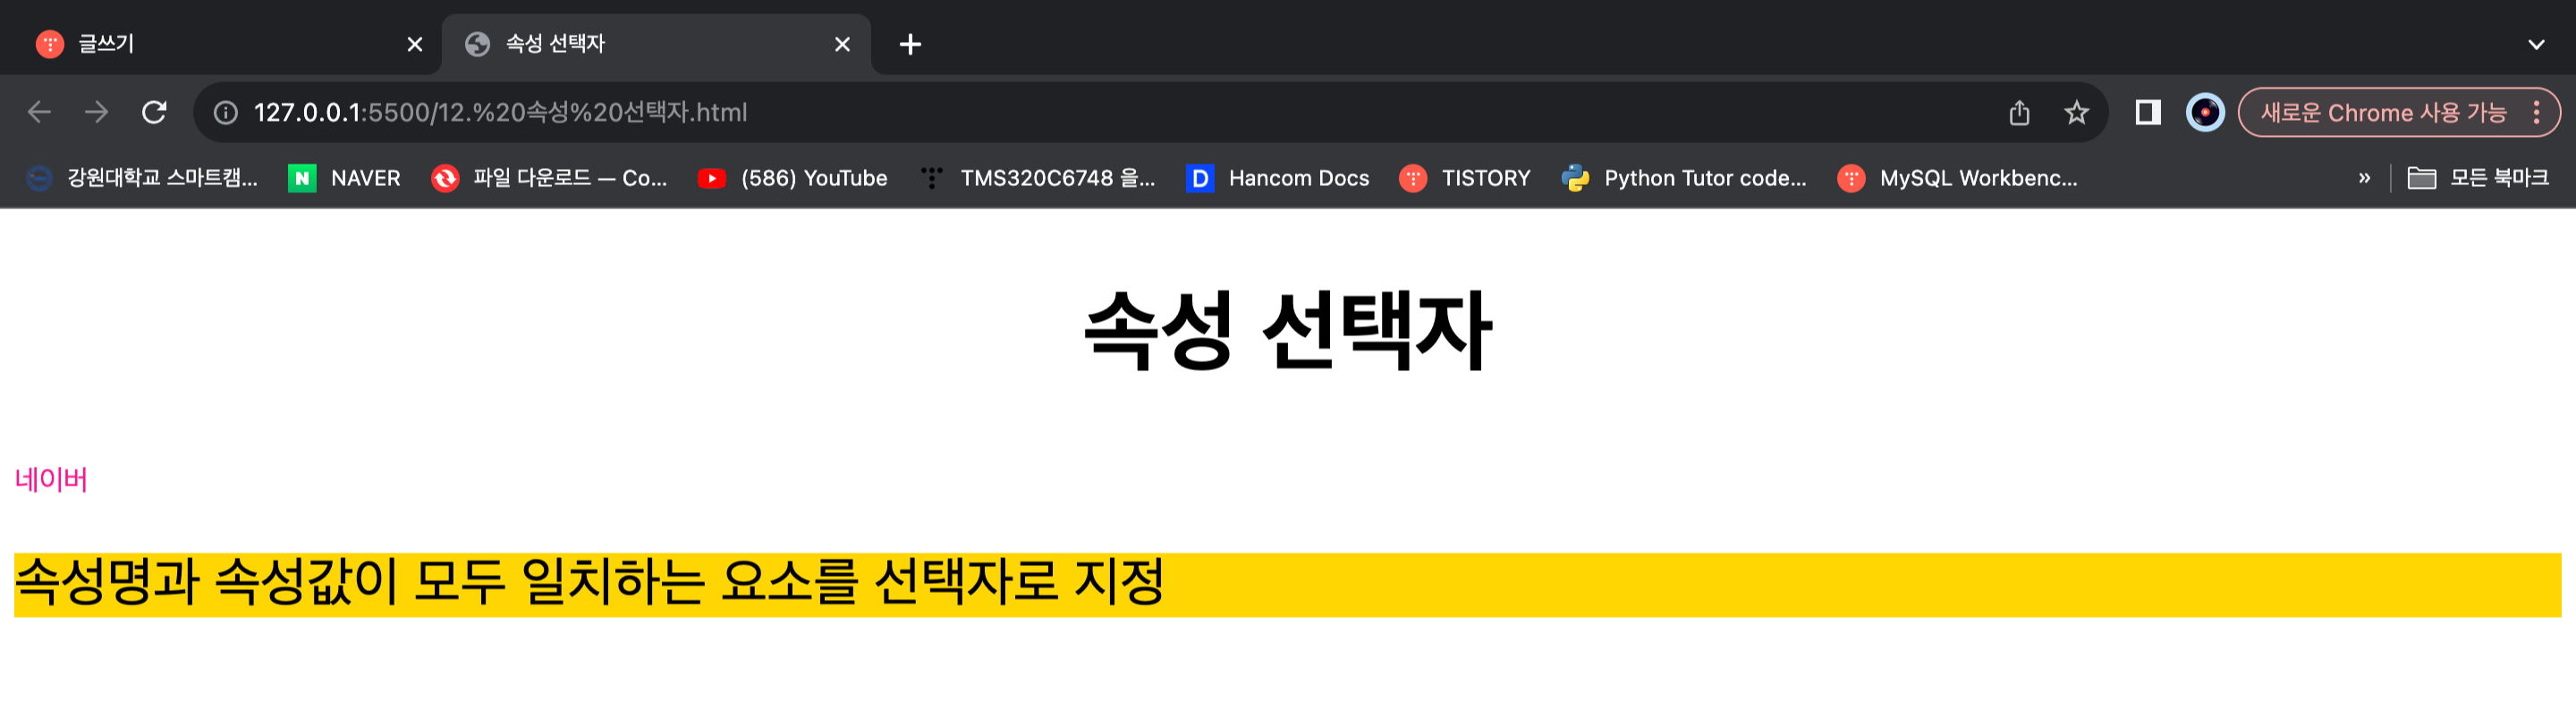
속성 선택자
- HTML 요소에서 속성을 선택자로 지정해 스타일을 적용한다.
- 패턴이 너무 많다, 아래 링크에서 다양한 패턴을 볼 수 있다.
https://developer.mozilla.org/en-US/docs/Learn/CSS/Building_blocks/Selectors/Attribute_selectors
Attribute selectors - Learn web development | MDN
Now that we are done with attribute selectors, you can continue on to the next article and read about pseudo-class and pseudo-element selectors.
developer.mozilla.org
<!DOCTYPE html>
<html lang="en">
<head>
    <meta charset="UTF-8">
    <meta http-equiv="X-UA-Compatible" content="IE=edge">
    <meta name="viewport" content="width=device-width, initial-scale=1.0">
    <title>속성 선택자</title>

    <style>
        [href] { text-decoration: none; color: deeppink; }
        .attr { background-color: gold; }
        [class='attr'] { font-size: 30px; }
        [title] { text-align: center; font-size: 50px; }
    </style>

</head>
<body>
    <h2 title="h2 요소의 title 속성">속성 선택자</h2>
    <p><a href="https://www.naver.com" target="_blank">네이버</a></p>
    <p class="attr">속성명과 속성값이 모두 일치하는 요소를 선택자로 지정</p>
</body>
</html>
Result:
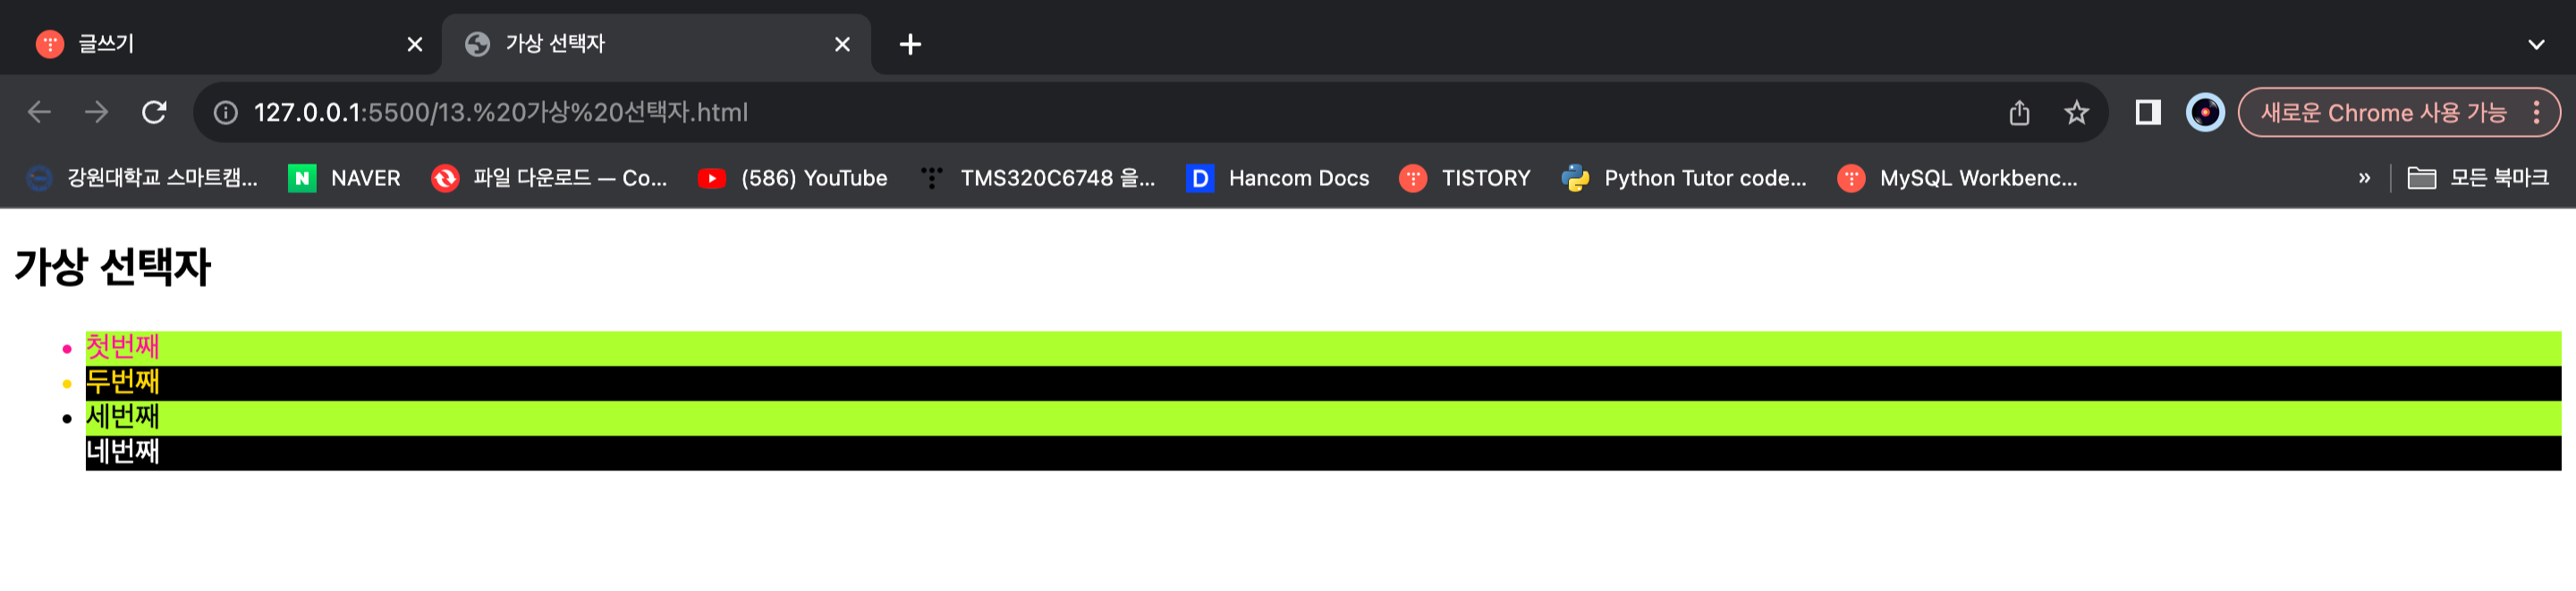
가상 선택자
- 클래스에 추가할 필요없이 요소 중에서 순서에 따라 원하는 요소를 선택
<!DOCTYPE html>
<html lang="en">
<head>
    <meta charset="UTF-8">
    <meta http-equiv="X-UA-Compatible" content="IE=edge">
    <meta name="viewport" content="width=device-width, initial-scale=1.0">
    <title>가상 선택자</title>

    <style>
        .list > li:first-child { color: deeppink; }
        .list > li:nth-child(2) { color: gold; }
        .list > li:nth-child(odd) { background-color: greenyellow; }
        .list > li:nth-child(even) { background-color: black; }
        .list > li:last-child { color: white; }
    </style>

</head>
<body>
    <h2>가상 선택자</h2>
    <ul class="list">
        <li>첫번째</li>
        <li>두번째</li>
        <li>세번째</li>
        <li>네번째</li>
    </ul>
</body>
</html>
Result:
CSS 선택자에 대해 알아보았다.
참고:
'웹 > CSS' 카테고리의 다른 글
| [CSS] CSS란, 사용 유형 (0) | 2023.10.10 |
|---|

댓글